FullStop Instructions
Assembly
This box contains
- red funnel (x2)
base piece with steel mesh filter (x2)- black extension tubes (x5)
- locking ring (x2)
- indicator cap (x2)
- foam floats (x14)
- green flexible tubing (x2)
- syringe (x1)
- bag of filter sand (x1)
See
|
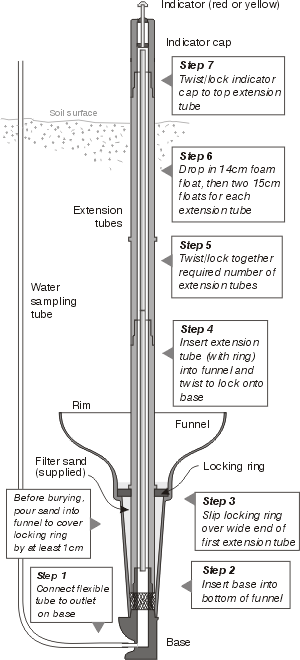
Before starting step 1, practise joining the base to an extension tube. Insert the base piece into the wide end of the extension tube by lining up the lugs, then pushing and twisting. The fitting will be in the locked position after a quarter of a turn clockwise. Undo this fitting and follow the steps below. Step 1: Connect the green flexible tubing to the 4 mm barbed outlet on Step 2: Insert the base into the bottom end of the funnel and push in as far as it will go. Step 3: Slip the locking ring over the wide end of Step 4: Pick up the base piece and funnel and join the extension tube to the base through the funnel. This requires a firm pushing and twisting action (quarter turn). When correctly joined there will be a watertight seal with no gap between the base and the funnel. Step 5: Add one or two more extension tubes, depending on Step 6: Drop in the foam floats. 5 floats are required if two extension tubes are used and 7 floats are needed if three extension tubes are used. Use the float marked with blue paint last (it is shorter). The last float must protrude 1 to 2 cm above the opening of the extension tube. Step 7: Add indicator cap - yellow for the shallow and red for the deep wetting front detector. The indicator should be in the fully down position. |
 |
Testing
Test each detector for leaks after it has been assembled by adding a syringe full of water into the funnel, with the flexible tube held upright to ensure water does not escape. The indicator will then rise and be held up by a magnet. No water should be visible at the join between the funnel and the base. Let the water out via the flexible tube and tap the indicator down to release the magnetic 'latch'. The supplied filter sand must not be added until you are ready to install the detector.
If you need to disassemble, remove floats first.
Depth Placement
The optimum depth of placement depends on the irrigation method and the frequency of irrigation, as well as the type of crop and soil. The table below is given as a guide, based on our experience. Placement depths are measured from the soil surface to the locking ring. If measuring to the rim of the funnel, subtract 10 cm from the depths in the table. With experience, these recommendations can be adjusted for local conditions.
| Type of irrigation | Notes | Shallow Detector | Deep Detector |
| Drip | Amount applied per dripper usually less than 6 litres at one time (e.g. row crops, pulsing) | 30 cm | 45 cm |
| Drip |
Amount applied per dripper usually more than 6 litres at one time (perennial crops) |
30 cm |
50 cm |
| Sprinkler |
Irrigation is usually less than 20 mm at one time (e.g. centre pivot, micro-jets) |
15 cm |
30 cm |
| Sprinkler |
Irrigation is usually more than 20 mm at one time (e.g. sprinklers and draglines) |
20 cm |
30 cm |
| Flood |
Deeper placements than shown needed for infrequent irrigations or very long furrow |
20 cm |
40 cm |
When the float is in the up position a wetting front has moved past the detector. The soil above the detector is as wet as it can be (almost saturated). That is why the above depths may appear to be shallow. A third detector, 10 cm below the deep detector depth shown above, can be installed if necessary.
 |
||
DRIPThe detector must always be placed directly under a dripper. It is common for detectors to respond quickly under drip because the water is concentrated around the dripper. If so, apply less water more often. |
SPRINKLERWetting patterns tend to be shallower under sprinkler irrigation than drip or furrow irrigation. Detectors will usually not be activated by applications under 15 |
FLOODDetectors should be positioned half under the furrow and half under the bed with the extension tube rising through the shoulder of the bed. This placement is also suited for sprinkler irrigated crops grown on raised beds. |
Troubleshooting
Before installation:1. Check for leaks: After After installation:2. Check the Float Indicator: Inject 30 ml of water from 3. Check the filter: Irrigate till float pops up – then remove all water from 4 mm tube with 4. Check the depth: Look for |
|

Service Pack
A service pack containing floats, indicator cap, syringe and extension tube is available.
Monitoring nutrients and salt
Water trapped in the detector can be sucked out with a syringe via the flexible tube and monitored for its electrical conductivity or nutrient concentration. Samples should be taken soon after irrigation. Note that the detector retains a small sample of water after self-emptying. This should be removed prior to irrigations from which samples for nutrient analysis are required.
Limitations
The FullStop™ Wetting Front Detector has been designed to respond to ‘strong’ wetting fronts. In soil physics terms, the strength of the front must be around 2 to3 kPa suction or wetter for the indicator to rise. In
© 2003 Commonwealth Scientific and Industrial Research Organisation (“CSIRO”). All rights reserved. The FullStop Wetting Front Detector is technology developed and owned by CSIRO Land and Water and manufactured in South Africa by Agriplas (Pty) Limited under licence from CSIRO Land and Water. The device or critical parts of the device are protected by the following patents registered in the name of CSIRO
Disclaimer
Any decisions to change water use should be incremental and must be closely and regularly monitored to ascertain any negative impact on the crop. To the extent permitted by law, CSIRO accepts no liability arising directly or indirectly out of any misuse, negligent or incorrect use of the FullStop, any non-adherence to assembly or installation instructions or any circumstances outside CSIRO’s control.
Installation
Step 1 – digging the hole
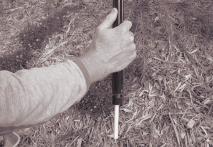
The detector is easiest to install using two augers: an auger (20 cm or larger in diameter) for the wide end of the detector funnel and another (5–10 cm in diameter) for the narrow end of the funnel. Alternatively, a spade and trowel can be used. Keep different soil layers
Step 2 – add filter sand and insert into
Pour the supplied filter
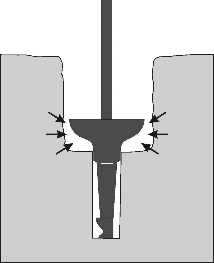
Holding the extension tube vertically upright in the hole, fill the funnel with soil removed from the layer at the same depth and firm down lightly. Hold the flexible tube alongside the funnel up to the soil surface. Pack soil under and around the sides of the funnel until it is firmly in place as indicated in the diagram below. The deeper narrow hole does not need to be packed with soil.
Step 3 – bury the FullStop detector
Break the sides of the hole as you return soil above the detector, as smooth sides may restrict the growth of roots and the movement of water. The hole must be filled by returning the removed soil to its original layer. Soil should be firmed down by hand but not compacted. All the soil should be returned to the hole leaving a slight hump over the installation. After settling, check to make sure the soil level over the installation site is the same as the surrounding soil so that
water does not run towards or away from the FullStop detector.
Step 4 –Activate the float
Water the site over the detector after installation to trigger the float. This may require 20 litres or more for a deeper installation.
Step 5 –Maintenance
Occasional testing and maintenance should be carried out to ensure the detector is operating as expected.
Ensure there are no leaks before installation. After installation, there are two further checks that should be carried out every few months.
Float mechanism: Inject 30 ml of water from
Filter: Irrigate till float pops up – then remove water from 4 mm tube with
If either test fails, see troubleshooting on
Depth of placement
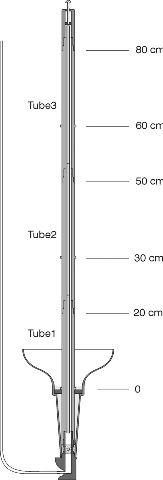 |
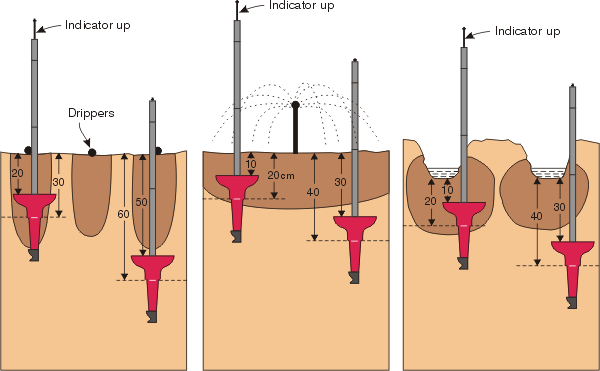
The depth of placement depends on the irrigation method and the frequency of irrigation. The indicator pops up when the wetting front has moved about 10 cm below the rim of the funnel, The position of the ridge on the extension tube can be used to show the depth after installation. If the ridge on tube 2 is at the surface, the depth of detection is 30 cm. If the ridge on tube 3 is at the surface, the depth of detection is 60 cm. |
Improving irrigation practice
When starting out, we recommend you continue to irrigate according to your normal practice while you get a ‘feel’ for how the detectors are responding. Then compare your normal practice to what the FullStop shows you as summarized in the table below.
Once you have developed some confidence in the way the detectors are working, you are ready to improve irrigation, nutrient and salt management. Change your water use practice at the rate at which you are comfortable, taking into account the growth and/or yield response of the plants. Note that it is not necessary to get the desired detector response after each irrigation – the general trends are more important.
| Shallow Indicator | Deep Indicator | Meaning* | Action |
| Down | Down | Insufficient water for established crops | Apply more water at one time or shorten the interval between two irrigations |
| Up | Down |
|
Most of the time this is the desired result. During hot weather or when the crop is at a sensitive growth stage, the deep detector should respond |
| Up | Up |
The wetting front has moved to the bottom or below the root zone |
If this happens regularly then over-watering is likely. Reduce irrigation amounts or increase the time interval between irrigations. |
| Down | Up |
Soil or irrigation |
Go through troubleshooting steps. Ensure the soil surface is level over the detectors. Check uniformity of irrigation or location of drippers. |
* this assumes that detectors have been placed at depths suited to the irrigation system and management regime
Four things you need to know
1. Resetting the indicator
Water is ‘sucked out’ of the detector after irrigation by the soil around it. You must reset the detector after the indicator pops up by pushing the indicator gently down to release the magnetic latch. If the indicator immediately pops up again, it means that the soil is still very wet. If the detector will not reset for several days after irrigation, the soil is close to waterlogged.
2. Indicator up means a strong front has moved past the detector
A wetting front will always move deeper than the detector after the indicator pops up. If the soil below the detector is dry, the wetting front will only move a short distance further. If the soil below the detector is wet, the wetting front can move a long way past the detector after the indicator pops up.
Therefore it is important not to place detectors too deep, particularly for sprinkler irrigation.
3. Effect of soil disturbance
The soil structure is disturbed during installation of the detectors. This is not a problem for installation into ploughed soil. In the case of perennial crops, the soil will need to settle and the roots grow back into the disturbed zone before the detector will give reliable information.
4. How many FullStop detectors do you need?
It is best to have three pairs in a field because irrigation is usually not uniform and soil properties and crop growth vary. Some irrigation systems (e.g. mini-sprinklers) tend to have large variability over small distances. Uniformity of wetting patterns should be measured and detectors placed in ‘wetter’ and ‘drier’ spots to give an indication of variability in wetting front depths.
