How to set up your Chameleon Wi-Fi Reader v0.77
Note: These instructions are for Chameleon Wi-Fi Reader firmware version v0.77. See Find your firmware version.
The first time the Wi-Fi Reader is used it will display the message ‘Configure Wi-Fi’.
This means that the Reader is looking for a Wi-Fi connection to send data to the website. However, it cannot connect to a known Wi-Fi Access Point. Configuring the Reader to a Wi-Fi Access Point only needs to be done once.
The Wi-Fi Access Point used for an Internet connection can be:
- A permanent Wi-Fi Access Point near the sensor location, which automatically uploads data every 2 hours.
- A temporary Wi-Fi Access Point, like a mobile phone Personal Hotspot, which can be taken to the sensors.
Wi-Fi Configuration Instructions
|
The Chameleon Wi-Fi Reader has three lights showing soil water at three depths and a screen showing the Sensor ID, Temperature, Battery status and Resistance readings. |
|
|
The Chameleon Wi-Fi Reader screen 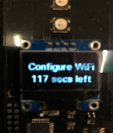 |
The first time the Reader is used, after reading all the sensors, it will display the message ‘Configure Wi-Fi’ and then start a 180 second countdown. This means that the Reader cannot find a known Wi-Fi Access Point it can use to send data to the website. |
Wi-Fi Access Point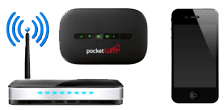 |
The Wi-Fi Access Point you use may vary based on your situation and can be:
Ensure your Wi-Fi Access Point is turned on. If using a phone, go to the Personal |
|
Config Device 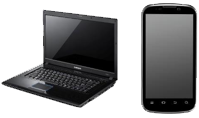 |
To configure the Wi-Fi Reader to your Wi-Fi Access Point you temporarily need another device. We will call this the ‘Config Device’.
The Config Device can be:
|
|
Turn on Wi-Fi Reader by pressing the reset button at the bottom. It will scroll through the readings then display ‘Configure Wi-Fi’ and start a countdown. On the |
|
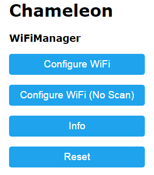 |
The Config Device it should take you to a webpage ‘Chameleon WiFiManager’. If this does not occur after about 30 seconds, manually open a web browser and enter the website address: 192.168.4.1 Select ‘Configure Wi-Fi’. |
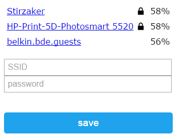 |
A list of available networks will display. Select the desired network and enter Select ‘Save’. |
 |
The Wi-Fi Reader will now attempt to upload the sensor data to the website and if all goes well will display ‘Upload Confirmed’.
The data can now be viewed on https://via.farm. |
Although the Wi-Fi Configuration is a once-off procedure, it may not work the first time. If not, turn the Wi-Fi connection off and on, ‘forget’ the Chameleon connection on the Config Device and try again.
Once successful, the Wi-Fi Reader will be permanently paired to the chosen Wi-Fi Access Point. To pair it to another Wi-Fi Access Point, turn off the first Access Point or take the Wi-Fi Reader out of range and follow these instructions again.
