Pairing with Android 5.0 (Advanced)
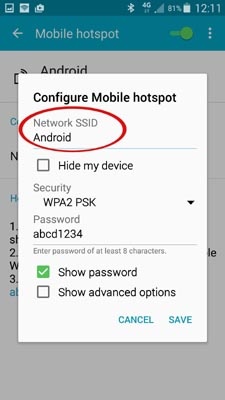
In this example the Android's network name and Wi-Fi password are:
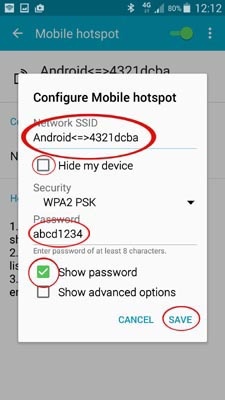
Network name (SSID): Android
Wi-Fi Password: abcd1234
For your setup, you may use whatever details you like.
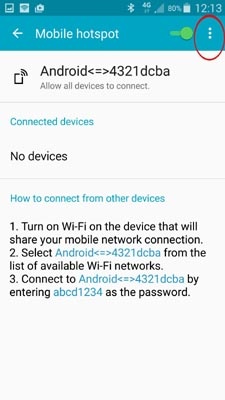
Using the above details the Wi-Fi Config Beacon's SSID (Network name) will be: Android<=>4321dcba
Note: These instructions are based on Android version 5.0 (Lollipop). If you are running an older version eg. 4.4 (KitKat) 4.1 (Jelly Bean), the steps will be slightly different but the concept is the same.
A Quick Summary
- In this
procedure you will change your phone's original SSID (network name) by adding “<=>” to the existing SSID as well as your Wi-Fi password in reverse. - The Chameleon Wi-Fi Reader will then scan the Wi-Fi networks and find the network name and password to use.
- You will then change the SSID (network name) back to the original, allowing the Chameleon to connect to the Wi-Fi with the details it discovered.
Prepare the phone as a Wi-Fi Config Beacon
|
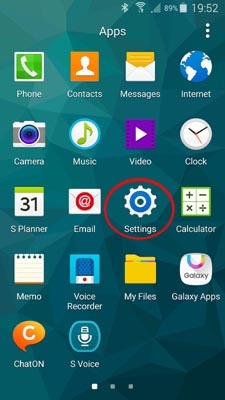
Step 1 |
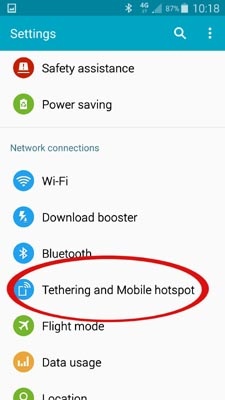
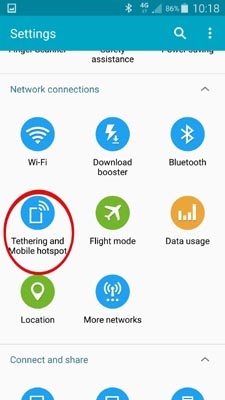
Step 2 Press: Tethering & portable hotspot |
|
 |
 |
 |
|
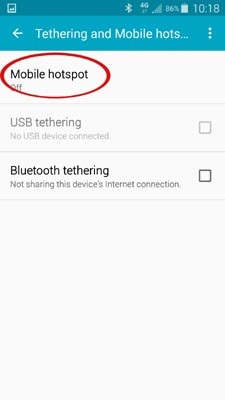
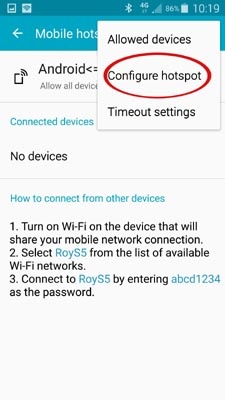
Step 3 |
Step 4 |
Step 5 |
 |
 |
 |
|
Step 6 Tick Show password |
Step 7 |
 |
 |
- Step 8: Plug the sensor into the Wi-Fi Reader
- Step 9: Press the Reset button on the bottom of the Wi-Fi Reader
- Step 10: Wait for the screen to display: Trying SSID: Android
- Step 11: Leave the Wi-Fi Reader trying and change your phone's network name back
Change the phone's network name back
|
Step 12 |
Step 13 |
Step 14 Change back the name |
|
|
 |
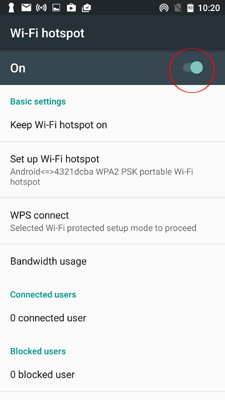
| Step 15 Turn on the Wi-Fi hotspot |
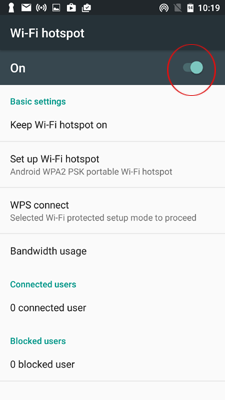 |
The Wi-Fi hotspot screen must be displayed (
Now the SSID (Network name) and password are saved in the Wi-Fi Reader and the Config Beacon is no longer required.
Finally, test all is working by pressing restart on the Wi-Fi Reader and see that Upload Confirmed is displayed again.
